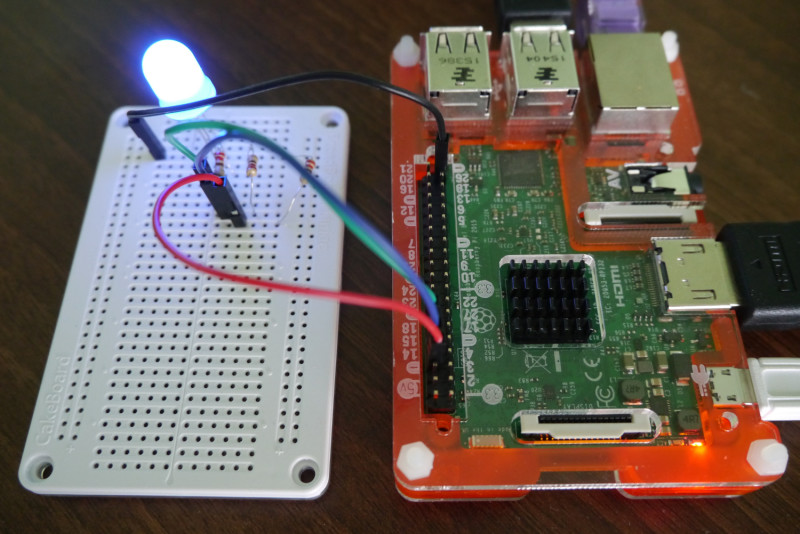
Keeping up to date with Twitter can be very time-consuming, especially if there are lots of tweets. What if you could see at a glance what the Twittersphere thinks about a certain topic? In this tutorial we’re going to build a simple RGB LED circuit, and program it to change colour to indicate whether the tweets that include a given hashtag or keyword are using positive, negative or generally neutral language.
The full article and others like it can be found in Simple Electronics with GPIO Zero and was written by Richard Hayler
You'll need
- RGB LED
- Breadboard
- Jumper wires
- 3× 100 ohm resistors
- Twitter developer account
- TextBlob Python library
- Twython Python library
STEP-01 Install Python libraries
Update your Pi to the latest version of Raspbian and download and install the additional software you’ll need.
sudo pip3 install twython textblob
There are two libraries that make our project really easy. Twython allows you to contact Twitter using Python and collect tweets (you’ll need to register for a Python developer account – see step 5). Then, to read the tweets in the code, we’re going to use TextBlob; there are other libraries available, but this is one of the simplest.
STEP-02 Do you like sausages?
Let’s take a look at a simple example. Open a Python 3 interpreter (either use the command line or IDLE) and type:
>>> from textblob import TextBlob
>>> sentence = TextBlob('I really like sausages, they are great')
>>> sentence.sentiment.polarity
0.5
Any value for polarity greater than 1 indicates a positive sentiment (like); a value less than 1 suggests negative sentiment (dislike). Try changing the sentence and see how a different phrase will give a different result. Results will be more accurate if you have more text, although a 140-character tweet is normally good enough.
STEP-03 Select your RGB LED
Light-emitting diodes (LEDs) are cool. Literally. Unlike a normal incandescent bulb which has a hot filament, LEDs produce light solely by the movement of electrons in a semiconductor material. An RGB LED has three single-colour LEDs combined in one package. By varying the brightness of each component, you can produce a range of colours, just like mixing paint. There are two main types of RGB LEDs: common anode and common cathode. We’re going to use common cathode.
STEP-04 Connect up the RGB LED
LEDs need to be connected the correct way round. For a common cathode RGB LED, you have a single ground wire and three anodes, one for each colour. To drive these from a Raspberry Pi, connect each anode to a GPIO pin via a current-limiting resistor. When one or more of these pins is set to HIGH (3.3V), the LED will light up the corresponding colour. Connect everything as shown in the diagram.
 STEP-05 Register as a Twitter API developer
Anyone with a Twitter account can register as a developer, although you might be asked to provide a mobile phone number or other identification details. Once you’ve registered, you need to create a new application at apps.twitter.com. Click the button to create a new app and then fill in the required fields. Once that’s done, select the ‘Keys and Access Tokens’ tab and click on the ‘Create my access token’ button.
STEP-06 Process some tweets
Download or type up the code from the tweetometer.py listing. Add the Twitter API keys and tokens generated in step 5 at the appropriate places. Now pick a hashtag or keyword for testing. As this is US presidential election year, we found that using the name of one of the candidates generated more than enough data! Run the code: you should see a running count of the analysed tweets on the console, and the LED should flash with each new matching tweet. Between new tweets, the LED will remain the colour of the sentiment with the biggest count.
Code listing
Download the code from GitHubimport time, sys
from textblob import TextBlob
from gpiozero import RGBLED
from twython import TwythonStreamer
# Add Python Developer App tokens and secret keys
APP_KEY ='ENTER APP KEY HERE' # 0.1: # Positive
print('Positive')
status_led.blink(on_time=0.4, off_time=0.2, on_color=(0, 1, 0), n=1, background=False)
totals['pos']+=1
# Adjust value below to tune sentiment sensitivity
elif tweet_pro.sentiment.polarity < -0.1: # Negative
print('Negative')
status_led.blink(on_time=0.4, off_time=0.2, on_color=(1, 0, 0), n=1, background=False)
totals['neg']+=1
else:
print('Neutral') # Neutral
status_led.blink(on_time=0.4, off_time=0.2, on_color=(0, 0, 1), n=1, background=False)
totals['neu']+=1
overall_sentiment = max(totals.keys(),key=(lambda k: totals[k]))
status_led.color = colours[overall_sentiment]
print(totals)
print('winning: ' + overall_sentiment)
time.sleep(0.5) # Throttling
def on_error(self, status_code, data): # Catch and display Twython errors
print( "Error: " )
print( status_code)
status_led.blink(on_time=0.5,off_time=0.5, on_color=(1,1,0),n=3)
# Start processing the stream
stream2 = MyStreamer(APP_KEY, APP_SECRET, OAUTH_TOKEN, OAUTH_TOKEN_SECRET)
while True: # Endless loop: personalise to suit your own purposes
try:
stream2.statuses.filter(track='magpi') #


