The secular festival of Good Telly Season is just around the corner, so what better time to make a PVR that does everything? From recording TV shows to streaming favourite films from your NAS to playing tunes from your smartphone, a PiVR can do everything apart from virtual reality: the name’s a little misleading like that.
Better still, your PiVR only uses USB devices and requires a few fairly basic terminal commands to get running. There’s nothing here to scare a Pi novice, and plenty to please the experts.
The full article can be found in The MagPi 51 and was written by Clive Webster.
You'll need
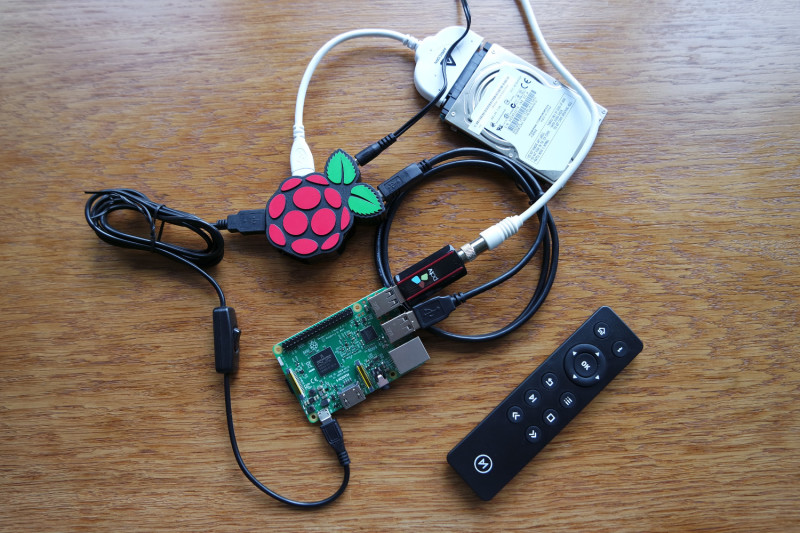
The PiVR is based around a Pi 3, both for its processing power and the current it can feed to USB devices. The TV tuner used in this project can be bought online. However, with this TV tuner taking up to 500mA, an old laptop hard disk sucking 1A and the Pi itself consuming up to 800mA, we worried about brownouts if we powered everything from the Pi. We therefore based our project around a 3A powered USB hub: plenty of headroom.
OSMC and the software
We chose OSMC as the basis for the PiTV, as it incorporates the popular Kodi front-end (albeit in skinned form) with a full Raspbian back-end. Essentially, it’s easy to use and easy to modify and add to. Better yet, it’s a cinch to install: download the installer and it’ll set up your SD card automatically. You can even enter your WiFi details during the install so the Pi is ready to go once it’s booted.
Update OSMC and its apps in the usual way, over SSH. The login credentials are osmc/osmc: change these as soon as possible via the passwd command.
sudo apt-get update && sudo apt-get -y upgrade
If your hard disk has also lived a former life, wipe and format it with fdisk and then reboot.
fdisk /dev/sda
Next, mount the hard disk and link it to a folder called recordings:
sudo mkfs.ext4 /dev/sda -L storage
sudo mkdir /mnt/recordings
sudo mount /dev/sda /mnt/recordings
sudo chown osmc:osmc /mnt/recordings
sudo chmod 777 /mnt/recordings
Now you can find your Pi’s serial number, which is needed to buy an MPEG-2 codec licence for your Pi (this licence will be tethered to your Pi). Without an MPEG-2 codec licence, the Pi will have to decode the TV signal in software rather than its bespoke hardware, which can lead to overheating and general performance issues. Follow the instructions online and pay the £2.40. Your licence code should arrive within 72 hours; add the entire line of the received MPEG-2 licence to your config file:
sudo nano /boot/config.txt
Getting your TV tuner up and running might require some detective work, but your first step is to find your tuner on magpi.cc/2dDNsLv. If you’re lucky, your tuner won’t require specific firmware, otherwise you’ll have to download it, typically from GitHub. However, our PCTV TripleStick (292e) required even newer firmware.
wget http://palosaari.fi/linux/v4l-dvb/firmware/Si2168/Si2168-B40/4.0.25/dvb-demod-si2168-b40-01.fw
sudo mv dvb-demod-si2168-b40-01.fw /lib/firmware
sudo reboot
dmesg
The return from dmesg shouldn’t list any errors regarding firmware not downloading. If so, you can proceed to setting up Tvheadend, the server and client combination that handles all the live TV duties for the PiVR.
Tvheadend on OSMC
The easiest way to install the latest, correct version of Tvheadend is via OSMC’s front-end. First, you must navigate its awkward setup procedure; use only a keyboard, as it’s too easy to get confused as to which level of menu or option you’re selecting with a mouse. Once negotiated, head to My OSMC and track across to Remotes to set up your remote. Then track back to the OSMC Store and install Tvheadend (it’s free, don’t worry), not forgetting to select Apply to actually start the installation.
Once installed, you’ll need to switch to another computer to set up Tvheadend; point a browser to http://[pi-ip-address]:9981 and log in with osmc/osmc. Now follow this setup order to avoid getting into awful tangles with Tvheadend. First, head to Configuration > DVB Inputs > Networks. Click Add and then choose DVB-T as the Type; on the next screen give your ‘network’ a relevant name and select the correct Predefined Mux for your TV area (see digitaluk.co.uk if you’re not sure). If you’re on the edge of two masts’ coverage, add a network for both.

Now go to the TV adapters tab and select your TV tuner; on the right-hand pane, tick the Enabled box and add any and all networks via the Networks field. Head to the Muxes tab and you should see many entries with a scan status of PEND; after a while, these will switch to Active, and hopefully then to OK. The last job in the Tvheadend webpage is to head to the Recording tab and change the recording location to your hard disk, in our case mnt/recordings. Click Save which is toward the top-left for this section.
Now you can switch back to OSMC on your Pi. Head to Settings > Add-ons > My add ons > PVR clients > Tvheadend HTSP Client. Press Enter on your remote, then select Configure. Enter the Tvheadend login details (osmc/osmc) and then select Enable. Finally, head to Settings > TV > General and tick Enabled; you should see OSMC update a few things. Head back to the main OSMC menu and you’ll now see an option for Live TV. Open that, and you’ll see an EPG and other such options. To watch a show, select it from the EPG and then press Back on your remote until you go ‘beyond’ the main menu into full-screen live TV.


