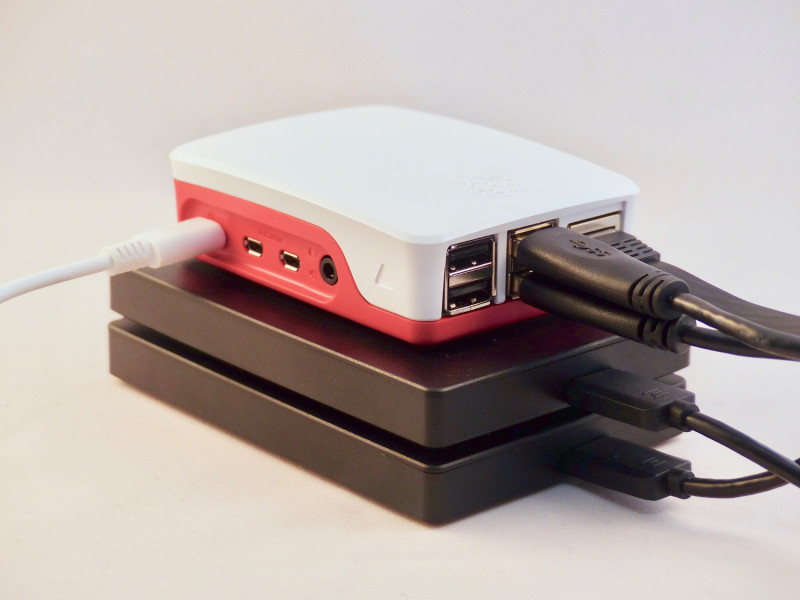
If you’ve got a lot of files like photos, music, or movies, chances are they are sitting on a hard drive somewhere. Getting access to those files and making sure they are protected from drive failure can be challenging without an expensive network-attached storage (NAS) solution. These file- and media-serving black boxes can punch a hole in your bank account, particularly the professional versions aimed at businesses. Now, thanks to the improved throughput of Raspberry Pi 4 with USB 3.0 and Gigabit Ethernet, you can build a fully featured NAS for a fraction of the cost.
This article first appeared in The MagPi 85 and was written by PJ Evans
You'll need
- 2 × External USB drives (minimum), e.g. these Seagate hard drives
- USB 3.0 powered hub
- Gigabit Ethernet (recommended)
- UPS (optional)
Step 01: Is NAS for you?
So what is a NAS, anyway? A well-implemented, network-attached storage device is typically a headless device (no keyboard or monitor) providing access to large amounts of data from anywhere on your network. It must also offer availability and resilience for your data. That means it should protect against system failures that cause significant downtime, and make sure no data is lost as a result of those failures. The files themselves should be available with appropriate security measures over desired protocols. In simpler terms, it’s a box on to which you dump all your movies, photos, music, and other stuff so you can get to it wherever and whenever.
Step 02: Self-storage
The most important decision you’ll make is how much storage you’ll need. The design of Raspberry Pi means using external USB disks. Rotary drives give us lower cost and higher capacity than SSDs. Raspberry Pi 4 offers USB 3.0, so make sure you get external USB drives that take advantage of that extra speed. To provide a layer of protection, you’ll need to double the number of drives to make sure your data is safer. We decided on 1 terabyte of storage, meaning two 1TB external drives. For reliable power we added a powered USB 3.0 hub.
Step 03: Prepare the OS
Download Raspbian Buster Lite and burn it to a microSD card. Once booted, make sure SSH has been enabled by running sudo raspi-config and selecting Interfacing Options > SSH. If you wish, configure WiFi at this point, but for a decent NAS you’ll ideally be using the lovely full-speed Gigabit Ethernet port. Finally, change your password and, under Network Options, change the Hostname (the NAS’s network name) if you wish. We imaginatively changed ours to ‘nas’, so the network address is ‘nas.local’. Finally, make sure everything is up-to-date with sudo apt update && sudo apt -y upgrade, then reboot.
Step 04: Add your storage
Using the powered USB 3.0 hub connected to your Raspberry Pi, plug in all your USB disk drives. Give the system a few seconds to ‘see’ the disks, then enter the following:
lsblkThis command tells you about devices connected to the system. The one starting ‘mmcblk0’ is the microSD card containing Raspbian. If you have two USB disks installed and working, you should also see ‘sda’ and ‘sdb‘ (Storage Device A and Storage Device B). If you have more drives, it will continue up the alphabet.
Step 05: Prepare the drives
Next, we need to partition the drives so Raspbian can understand how to store data on them. To do this we use fdisk.
sudo fdisk /dev/sdaWhen prompted for a command, enter ‘n’ for new partition. (If you get an error that a partition already exists, use ‘d’ to delete it – this will lose any data on the disk!)
Then enter ‘p’ (for primary partition). You’ll be asked a series of questions about sectors. Don’t panic. Just keep pressing ENTER (accepting the defaults) until ‘Created a new partition’ appears. Now type ‘w’ (to write the changes to the disk).
fdisk will now exit. You need to repeat the process for the second drive by entering:
sudo fdisk /dev/sdb…repeating the process as before.
Step 06: Create the RAID
RAID (redundant array of inexpensive disks) is a method for protecting data by duplicating it over multiple disks. There are many different forms, but we’re using one of the simplest: RAID‑1, or mirroring. Anything written to one disk is automatically written to the other. Should a disk fail, your NAS keeps running and you don’t lose anything. Replace the failed disk as soon as possible and the array is ‘rebuilt’.
First, install the software RAID manager, mdadm:
sudo apt install mdadmNow instruct mdadm to create the RAID-1 array:
sudo mdadm --create --verbose /dev/md0 --level=mirror --raid-devices=2 /dev/sda1 /dev/sdb1Step 07: Mount the drive
Raspbian will now see both physical disks as a single device. You can format and mount the new virtual drive:
sudo mkdir -p /mnt/raid1
sudo mkfs.ext4 /dev/md0
sudo mount /dev/md0 /mnt/raid1/
ls -l /mnt/raid1/
You should see one item: ‘lost+found’. The RAID-1 system is operational. Next, make sure that the drive is mounted whenever you boot.
sudo nano /etc/fstabAdd the line:
/dev/md0 /mnt/raid1/ ext4 defaults,noatime 0 1Quit (CTRL+X, followed by Y), then run the following so the RAID array starts up correctly on boot:
sudo mdadm --detail --scan | sudo tee -a
/etc/mdadm/mdadm.conf
Reboot and you should have /mnt/raid1 ready to go.
Step 08: Do the Samba!
Now to share some files on the network using the popular protocol, SMB/CIFS. The Raspbian version of this has the slightly more friendly name of Samba, but it is not installed by default. Run the following:
sudo apt install samba samba-common-binIf you are asked any questions, just select the default answer. Now let’s make a directory and allow all users access:
sudo mkdir /mnt/raid1/shared
sudo chmod -R 777 /mnt/raid1/shared
Tell Samba to share the directory on the network by editing the config file:
sudo nano /etc/samba/smb.confAt the bottom, add the following:
[shared]
path=/mnt/raid1/shared
writeable=Yes
create mask=0777
directory mask=0777
public=no
Save (CTRL+X, followed by Y), then restart Samba:
sudo systemctl restart smbdStep 09: Granting access
To give a user access to the shared files, we need to run a special command to set a Samba password. So, to grant access to the current user, ‘pi’:
sudo smbpasswd -a piYou’ll be asked to choose a password (it doesn’t have to be the same as your Raspberry Pi password). Once done, the user ‘pi’ can access the Samba share from Windows, macOS, or other Raspberry Pi devices, with the ability to read and write files.
To create additional users:
sudo adduser username
sudo smbpasswd -a username
…where ‘username’ is your choice of username.
Step 10: Create home directories
If you want to create file shares that are private to individual users, just create their own directory on the RAID array:
mkdir /mnt/raid1/shared/username
sudo chown -R username /mnt/raid1/shared/username
sudo chmod -R 700 /mnt/raid1/shared/username
Again, replace username with the user you want. Now only that user can access that directory.
Alternatively, you can create additional entries in smb.conf for multiple shares.

Step 11: Backup, backup, backup
RAID is not a backup system. It provides a certain level of data redundancy, but will not be of any help if you accidentally delete a file. If a drive does fail, your system will be in a ‘degraded’ state, meaning that data is at risk until the drive is replaced. If the second drive fails, disaster.
The ideal solution is to use a cloud provider such as Google or Dropbox to back everything up. Utilities such as Rclone can sync entire directory structures onto many different providers’ storage. Set this up and create a regular cron job to make sure your data survives.
Step 12: Don’t interrupt!
You can polish off this project with an uninterruptible power supply (UPS). Sudden power cuts can spell disaster for Linux-based systems due to the way they handle files in memory. This battery backup safely keeps your Raspberry Pi and hub running in the event of a power cut. Many UPSes can communicate their status to your Raspberry Pi over USB, so a safe shutdown can be triggered.
Step 13: Add more features
Our NAS can now create file shares, the most basic of capabilities. Professional NAS software often offers additional protocols such as Apple AFS, FTP, and many others. Most of these can also be implemented on a Raspberry Pi NAS. For the more adventurous user, Docker is an excellent way of making your NAS perform multiple functions without getting into a configuration nightmare. Why not set up a DLNA streaming server or run multiple databases? If you’ve enabled SSH, you’ve already got SFTP available; just connect using your favourite FTP client using /mnt/raid1/shared as the starting point.
Step 14: Conclusions
NAS can be expensive. For a much more affordable way to store loads of files to share with friends or family, Raspberry Pi 4 is ideal. It can’t compete with Intel-based systems in terms of speed or features, but if you have some external USB disks lying around, it’s a very affordable way to not only serve your data, but protect it as well.
Thanks to Alex Ellis and Emmet Young for their excellent blog posts on RAID and Samba.


