

Introduction: Personal Assistant Robot (Finds Objects and Follows You) Ft. Raspberry Pi + RoboClaw


Watch the YouTube video for a complement to this Instructable post.
This robot has been a dream robot for me to build for a long time. Before diving into how to build this robot, let me give a quick overview of what this robot is capable of!
- You can ask the robot to follow you around. (Done via the TensorFlow face detection computer vision algorithm)
- You can ask the robot to find you and then follow you. (Again this will use computer vision + ML)
- You can ask the robot to find any object (from this list) for you, pick it up using its robotic sled and bring it to where you are.
- You can give the robot a voice command to carry the collected item and follow you around like an assistant robot.
- Best part of all this is you can issue all these commands via speech as the robot has voice recognition.
This robot is truly special because it can use Machine Learning models to 'see' the world via a generic camera and perform tasks depending on how the detected object's position is changing in the camera.
This robot is built around the ever popular Raspberry pi, the incredibly powerful RoboClaw motor controller, and the common Rover 5 robot platform. Furthermore, all the additional physical parts are 3D printed. This robot also uses the Tensorflow USB Coral accelerator to speed up the Raspberry Pi's slow object detection. More on all this in the next few steps
The first part of this Instructables guide will cover some the theory behind how the algorithms and code works. The second half of this Instructables guide will cover how you can build this robot yourself including the physical building + installing libraries etc.
All the code, 3D printed files and other opensource files are available for free here:
3D printable files: https://www.thingiverse.com/thing:3794952
Supplies
(Many more details available on the electronics parts in Step 4)
3D printed Files (more details in step 3)
Raspberry Pi 3b/3b+
2 of 2x7A RoboClaw motor controllers
USB Webcam (or Pi Camera + USB Microphone)
Google Coral USB accelerator
Ultrasonic Distance sensor
7-12V battery + 5V step down converter for the Raspberry Pi
Rover 5 platform
Geared brushed DC motor with encoders (robotic sled)
(Many more details available on the electronics parts in Step 4)
Step 1: Robot Vision Explained


Robot Vision (CV) Explained:
First let me quickly define a few terms
Computer Vision (CV): Computer Vision is using a computer to process a camera stream (2D mathematical values) to get a higher-level understanding of what the camera is capturing.
Machine learning (ML): Use thousands of images of an object --lets assume a cup-- and use this data to calculate a model (picture) for what the average cup looks like based on all the images in the data-set. More pictures = more accurate model.
This particular robot combines Machine Learning with Computer Vision. This means it passes the webcam stream through a machine-learnt model in order to detect objects in the frame. For example, based on the 'average cup model' ML example, the computer can look at the camera's video frame and try to fit the average cup image on to your new image. If it fits within a certain degree of accuracy, the new image will be labeled as a cup! By tracing where exactly this object is detected via the camera frame, we get object detection!
Sourcing 1000s of images of multiple objects and faces can be difficult. Furthermore computing what the avg object should look like (training a model) is an extremely computationally intensive task. Therefore, I decided to stick with the freely available 'Face Detect and 'Mobile-lite SSD COCO' models provided for free by google's TensorFlow library. (TensorFlow is the Machine learning program that actually trains the object detection model and compares new images/videos to classify them and detect objects within them.)
Face detection explained
Now once you have your face-detect model from Google, you can use it to find faces within a video stream! When the face-detect algorithm finds a face in the camera frame, it will output the accuracy with which it thinks it has found your face and the coordinates of your face in the video frame. Now here is the challenging part. How do we use this camera positional data to have the robot follow a person around?
The answer is simple. If the person's X coordinate is at the left 25% of the frame, then the robot will turn left till the person is centered in the frame again. If the person's X coordinate is in the right 25% of the frame, the code will tell the robot to turn right till the person is centered in the frame again. For example: If your webcam's resolution is 1280*720(1280 pixels wide and 720 pixels tall), then your left detection zone would be 0.3 x 1280 = 384 pixels. The right detection zone would be 1280-(0.3*1280) = 896 pixels. Therefore if the face you are tracking has an x coordinate < 384, the robot will turn left till the face's X coordinate is greater than 384 and vice versa for the right side. You can tweak this detection zone to your liking in the code. Furthermore, you could implement a more elegant PID loop for this task, but this simple solution works well for now!
So at this point we have taught the robot how to rotate/pan to track a person. However, the robot cannot successfully follow the person if the robot can't tell if a person is moving closer or further away. Don't worry, the solution to this problem is cleverly simple too!
We achieve distance tracking by tracking the changes in face area! The tensorflow model will return the x starting position, x ending position, y starting postion, and y ending postion of the detected object. By doing X end position- X start position we get the width of the object. By doing Y end position- Y start position of the detected object we get the width of the object. If you multiply these 2 values you get the area of the detected object! Now if the person's face's area is decreasing , that means the person is getting further away and the robot will move forward till the person is at the starting area again. If the person's face's area is increasing, then that person is getting closer to the robot and the robot must move back to follow the person and maintain the face area.
Object detection explained
The object detection model algorithm runs very similarly to the face detection. Instead of using the 'Face Detect' model, we use the COCO model which can detect 90 objects listed here. If the object being detected is to the right of the camera frame, the robot moves right to center the object, and if the object is to the left of the camera frame, the robot moves left to center the object.
However, unlike the face detection algorithm, the object detection doesn't use the detected object's area to determine if it needs to go closer or further. This is because the object detection is used to find objects and pick them up. Not maintain the same distance like the face detection. Some objects will be larger than others and using a standardized area value will not work.
To get around this issue, we can use a simple ultrasonic distance sensor mounted to the underside of the robot to measure the distance from the robot to the detected object. When this detected distance is less than a certain threshold, and if the robot is perfectly centered facing the object, the robot will run through a simple set of commands to open its claw, move forward, close its claw, and switch to face detection using the old face size value to find and go back to the person with the collected object.
Why did we need a secondary face detect model when the COCO model can detect people.
As mentioned in the Object detection section above, we used the COCO tensor flow model since it is already very accurate and fast at detecting 90+ commonly used everyday objects. Now some of you might have noticed that the Object detection COCO model can also detect people. So why didn't I use the COCO model for face detection? Well firstly the COCO model runs slower than the face detection model since its looking for over 90 types of objects vs 1 (faces) in the face detect model. When I say slower, I don't mean a 'lag' I mean a lower FPS. However, this lower FPS isn't the biggest problem. The biggest problem is tracking. You see, the COCO person detection algorithm actually detects the whole person's body rather than just the face which is problematic for determining area and if the robot should move closer or further from a person. If you are close to the robot and its camera, it will see your face and calculate the area based on that. But as you move away from the camera, more of your body comes into the webcam's view and therefore the size of the detected object grows according to the robot. Therefore, although you are walking away, the robot might actually think that you are getting closer so the robot will do the opposite of what it needs to do of coming closer to you and instead go backwards away from you. However, with faces, it is very unlikely for your face to be partially cut off by the webcam's field of view and it is a much more stable way of tracking and following humans.
Filtering the data
Next we come to filtering the actual input data from the object detection and Face tracking models. You see, these models are quite accurate, but sometimes give jumpy/twitchy coordinates between video frames or can give us false positives that can confuse our robot and turn it into a jittery mess.(Look at the project's youtube video for examples of this)
To remedy this, I implemented a simple filtering mechanism. Any time an object is detected with a confidence score below 80%, it will be ignored. This is great for filtering out false positives. But what about filtering out jumpy data? To do this I used a simple averaging function that takes the last 3 coordinates and averages them to give you the current coordinate used for the robot's movement calculation. These 3 coordinates are stored in an array and the oldest of the 3 data points gets replaced as soon as a new coordinate data point is returned from the computer vision model (FIFO). By averaging the 3 latest data points, we can easily smooth out jumpy data and also smooth out any outliers in the data. This method theoretically makes the robot slower to respond to fast movements, but with a high enough frame rate from the object detection models, this will not be an issue. You can always tweak the averaging to be more than or less than 3 values depending on your need for responsiveness vs smoothness. I found 3 to be the perfect balance where the robot didn't suffer from noticeable delays while also being smooth in its movement.
Webcam servo
I also mounted the Webcam used for this project on a tilt mechanism powered by a servo. The reason for this is that humans stand tall and their faces will be outside the webcam's field of view. Therefore, the servo powered tilt mechanism can tilt the webcam upwards when looking for faces, and tilt it back down to the ground when looking for objects to pick up.Do look at the attached pictures above for a better illustration of how the servo is attached.
Step 2: How the Robot Picks Up Objects


Now that the robot can find objects using CV & ML, we come to the actual object picking up step. This step is performed when the robot has successfully navigated to the object it is looking for and has also reached a certain trigger distance (in my code it was 30cm) from the object it is trying to pick up. The steps for picking up objects is as follows-
- The robot will first open its sled.
- Next the robot will move forward 30 cm.
- Next the robot will close its sled picking up the object.
- Next the robot will switch back into face tracking mode and go back to the person.
The sled itself is powered using Brushed DC motors. The reasoning for this is multifaceted. Firstly geared brushed DC motors are very small and easy to source. Next it is very easy to do precise positional control through the RoboClaw motor controller and encoders. Next brushed DC motors have incredible torque due to such high gear ratios. This is especially useful for when the robot sled is picking up a larger, heavier object.
I chose the sled design rather than a robotic arm due to a multiple reasons
- The robotic sled can pickup much bigger and heavier objects due to its big size. Plus the robotic sled doesn't have the chance of the object slipping out of a robotic claw's grip since the sled holds the objects via gravity.
- The robotic arm needs to know exactly where to go and this exact positioning is only doable with a secondary top-down camera making the robotic arm less practical.
- The robotic sled is sleeker than the robotic arm and reduces the size of the robot
- The robotic sled needs just one motor rather than multiple servo motors like the robotic arm
- The robotic sled can be easily 3d printed by anyone at home.
- The robotic sled is a much more cost-effective solution
Of those reasons, the biggest advantage to the sled was how it could actually pick up large objects with much less chance of slippage and without a secondary camera.
The sled works by connecting the brushed DC motor to a linear gear attached to the first sled arm. This linear gear again transfers the linear movement into another rotating gear which flips the direction of movement before transferring it to the secondary linear gear. Look at the annotated picture I've attached above for a much clearer view on how this works.
Step 3: How Does Voice Detection Work


The voice detection on the robot works via the SnowBoy voice detection program. Snowboy is an incredibly light weight, offline voice wake word detector.
- This means that SnowBoy barely uses any CPU power to detect voice(<2% on my Raspberry Pi 3)
- SnowBoy runs on the device locally. This means your voice or data is processed on the Raspberry Pi itself and not some internet server. These means your voice data is private and there aren't any privacy concerns.
- Snowboy is super customizable with whatever wake-word you want + supports multiple wake word detection
simultaneously.
.
Since Snowboy can detect multiple wake-words at once, I created a voice detection structure like so
Firstly the user says the wake word "Robot". A 10 second internal timer starts and the orange light turns on. Then the user has to give a second command such as
- "follow me": The rover finds the human and follows them.
- "coco cup" (cup was too short of a word to be accurately detected): This command asks the robot to find a cup and bring it to you
- "banana": The robot finds a banana and brings it to you.
- You can add more wakewords for the the other objects you want the robot to detect from the COCO data-set.
The reason for using the robot wake word before giving a command is to prevent accidentally having the wrong command trigger. As the robot moves around, the vibrations from the robot can sometimes create a false-positive where the program thinks you said a word but didn't. By adding the "robot" wake word and a 10 second timer to say your command after that helps filters out these random false-positives
** all the code is available in the further in the Instrucables post where I teach you how to install it **
Step 4: Physical Building


Now we move on to the physical building section of the robot. This robot was built around the common Rover 5 platform.
I chose this robot platform because it is very common and sold by multiple distributors, making it easy for anyone in the world to replicate this project. The second reason for choosing this robot was that it uses tank treads rather than wheels which make it much easier to pivot (one tank tread moves forward and the other tread moves back)ans also allows the robot to easily climb over small obstacles. The third reason for picking the Rover 5 Chassis was that this chassis comes with DC motors with encoders built in. Most robot chassis don't come with motors which have encoders. The encoders tell the RoboClaw motor controller where the motor is positioned and gives the RoboClaw and the robot much finer control over its movement.
Here are some links to where you can find the rover 5 platform.
https://www.sparkfun.com/products/10336
https://www.dfrobot.com/product-470.html
https://www.pololu.com/product/1551
https://solarbotics.com/product/50858/
The rest of the physical parts are all 3d printed. You can download all the parts here: https://www.thingiverse.com/thing:3794952 I have also added the .STEP and .F3D files so you can modify the parts to suit your needs. If you don't wish to modify the parts, you can download the .stl files and directly 3D print those.
Here is a list of all the parts you will need to print for this project.
- Base Plate: This part covers the opening on the Rover 5 platform. It also serves as the track for the robot sled linear gears. The robot sled motor and gears also mount to this part
- Sled arm 1/2: These 2 parts are the actual robotic sled arms that come together to pick up an object. The top of these parts also have linear gears which make them move. Print these at a higher than normal infill to ensure these parts are strong enough to pick up your objects
- Distance sensor mount: This 3d printed part mounts to the underside of the base plate. It houses the ultrasonic distance sensor used to detect when to pick up objects
- Motor gear: This part friction-fits onto the motor and converts the motor rotation into a 12 tooth gear rotation.
- Transmission gear 1: this part takes the motor gear movement and sends it to the first robot sled arm.
- Transmission gear 2: this part takes the linear movement from the first robotic sled arm and reverses it while sending it to the second robotic sled arm.
- Gear Cover: This part covers the gear assembly to protect it. It also helps secure the top of the robotic sled arms in place.
- Servo holder: This part mounts to the top of the gear cover and houses the servo used to rotate the webcam
- Webcam axle: This part mounts to the top of the gear cover on the opposite side of the servo holder and supports the webcam as it pivots.
- Webcam holder: This part houses the actual webcam and its connected to the Webcam axle and the servo holder allowing it to pivot.
- Robot Shell- This whale shaped shell is the final piece that goes over all the electronics to help hide and protect them. This part also contains the voice recognition status LEDs and also the push-button power switch. This part is optional if you wish to showcase your electronics rather than covering them.
Step 5: Electronics


Next we come to the actual electronics you need to make this project work
- Raspberry Pi 3/3B. This is the brain of the robot. The Raspberry Pi does all the computation for where the robot should go, how it should move and what task it should do now. The Raspberry pi is the hub for all the sensors and electronics and allows them all to work together. The Raspberry Pi 4 launched as I was finishing the project so this version doesn't use it. However, the Pi 4 but should be a great choice since its faster and also supports the USB 3.0 standard which will enable much faster object detection from the Coral USB accelerator
- 2X RoboClaw 2X7A. The 2 RoboClaws are the muscle of the robot. They are the motor controllers that actually allow the robot to move and do the tasks that it needs to do. The first RoboClaw controls both the tank-tread motors, and the second RoboClaw controls the the singular robotic sled motor. This motor controller is really special since it offloads a lot of the motor control processing from the Raspberry Pi since the Pi only needs to tell the Roboclaw where it wants the motor to move, and the Roboclaw can handle all the complex timing, speed, acceleration, timing of the motors.
- Google Coral USB Accelerator- This small USB powered device is actually an ASIC chip made by google to dramatically speed up Machine Learning tasks. The Raspberry Pi can only achieve 1-2 FPS using its built in CPU to handle Computer vision and object detection and that speed is too slow for the robot to be responsive. Furthermore, running the Object detection on the Raspberry PI CPU uses up 100% of the Raspberry Pi's CPU making it very difficult to do other tasks such as controlling the motors, performing voice recognition etc. Offloading to the Coral USB Accelerator allows the object detection to run at 8-12 FPS which allows the robot to be responsive while only using 20-30% of the Raspberry Pi's CPU leaving most of it free to do the other tasks mentioned earlier. The Raspberry Pi 4 would be a better choice for this project now that is has launched due to the Pi 4's USB 3.0 connector which should allow the Coral USB Accelerator to run 3-4 times faster!
- Step-Down converter: This small electronic piece takes the battery's high voltage and steps it down to a lower 5 volt signal. This 5v signal is used to power the Raspberry Pi via its USB power port.
- Webcam: You can use any generic USB webcam or the Raspberry Pi Camera. Do note that if you use the Raspberry Pi camera, you will need to use a separate USB microphone for voice recognition commands since the Pi camera doesn't have a mic. In my robot I used the Logitech C270 Webcam, but again, you can use any USB webcam including those cheap 5$ generic webcams on Ebay
- Battery: You can use any battery you want to use. LiPo batteries are great since LiPo batteries have a small footprint with a high power density and the ability to power all the electronics in this project without current limitations. I used a 2-Cell 7.4 volt 1500 MaH LiPo battery
- Motors: The rover 5 robot chassis comes preinstalled with motors. Use the pre-installed motors and encoders to drive the robot. For the actual robot sled, you can use any geared brushed DC motor with a built-in encoder and decent torque. Make sure your motor has a built in encoder since without an encoder, it is hard to precisely control the robotic sled's motion.
- Distance sensor- This is a simple HC-SR04 ultrasonic distance sensor. You can use any generic version of this sensor.
- Servo- Any generic 9 gram servo should work.
GPIO pinnout I used (This is customizable except for the TX/RX hardware serial pins on the Raspberry Pi
- Servo (For webcam panning)- GPIO17. GND & 5V power from the RoboClaw
- Orange LED (Used for when the "robot" wake word is detected): GPIO20+ GND
Green LED (Used for when a command is given after the "robot" wake word): GPIO21+ GND
- RoboClaw: RoboClawS1 --> RPI GPIO 14. RoboClawS2 --> RPI GPIO 15 (Connect GPIO14 to both Roboclaw's S1 header but only connect GPIO15 to the S2 pin of the RoboClaw responsible for robot movement)
- Ultrasonic Distance Sensor -->EchoPin --> GPIO8 . TrigPin --> GPIO24. VCC--> RPI 3v (If you connect your ultrasonic distance sensor to a 5v power source, you will need to use a simple voltage divider for your Echo Pin since the Raspberry Pi operates on a 3v logic signal)
RoboClaw Pinnout
- S1,S2 instructions in the Raspberry Pi Pinout section
- Motor A- Left wheel of the rover (Robot sled motor if this is the RoboClaw being used to control the sled)
- Motor B-Right wheel of the rover (Empty if this is the RoboClaw being used to control the sled)
- EN1- Left wheel of the rover encoders (Robot sled motor enocder if this is the RoboClaw being used to control the sled)
EN2-Right wheel of the rover (Empty if this is the RoboClaw being used to control the sled)
- Power in- Connect to 7-12 volt battery.
Step 6: Software/ Code Overview
There are 4 python scripts that run at the same time.
- The Voice recognition Snowboy script
- The main robot control script that tells the robot how to move based on the detected object input, the voice commands, and the distance senor reading
- The distance sensor script (This was having issues when I integrated it directly into the robot script probably due to it needing more precise timing and being slowed down by the multiple threads in the main robot control script)
- The object detection script that sends the webcam stream to the coral USB controller and recognizes objects based on what the robot is trying to find (faces vs COCO objects)
The reason I had to use 4 different scripts instead of merging them all into one script is twofold. Firstly, I was having issues with some of the scripts like the Snowboy voice detection and ultrasonic distance detection being buggy and not working due to the long time it took to run through the code loop when I combined all of them. This could be partially solved via multiprocessing (not multi-threading since only one thread runs at a time vs multiprocessing which can run 2 or more processes at the same time) but I was still having some timing issues. The second reason I could not combine the 4 python scripts was due to compatibility of their libraries. Some of the libraries the scripts needed only worked with python 2.7 while some libraries only work with python 3.x. Therefore I was forced to run separate python scripts.
To ensure communication between these various scripts, I used a very lightweight solution called MQTT. MQTT is often used by makers in IOT applications to add a lightweight and very fast communication protocol to smart-devices. By adding a separate thread to each program to check for incoming MQTT data, I was able to integrate all 4 python processes together in a very simple way. An alternative to MQTT could be pipes (if using multi-processing) or using web sockets. You might think that MQTT would add lag/delay in terms of communication from one process to another but since it was communicating within the Pi rather than transmitting the data over the internet, the actual delay of sending information was almost 0.
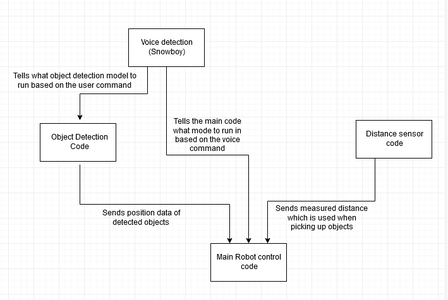
The 4 python scripts use MQTT to communicate in this manner. A mindmap drawing of this relationship is attached as a photo above
- The voice recognition snowboy script sends messages to the object detection script and the main robot script. This data tells the object recognition script what model to run (face detect or COCO) and tells the main robot control script what task are we currently trying to do
- The distance recognition script is always sending information to the main robot control script telling it the distance it is detecting at all times. This data is ignored unless the robot is looking for an object and the object is centered in the webcam's frame
- The object detection script is always sending information to the main robot control script to tell it what objects it is detecting and the detected object's coordinates.
Step 7: How to Install the Code + Libraries
Here are the steps to follow to install the code on your device.
Firstly download the project zip file from this GitHub link: https://github.com/SaralTayal123/Object-Finding-Ro... This will give you all the code for the robot. However, we need to install some libraries on our Raspberry Pi to make the code work appropriately
- Start by installing Snowboy voice recognition by following this link:
- more info here on how to set up the actual .asoundrc file
https://docs.kitt.ai/snowboy/ (Don't use the .asoundrc file from the docs.kitt.ai page. Use the format from the pimylifeup guide or the voice recognition won't work) - Install Coral/Tensorflow Dependancies using Google's official guide here:
https://coral.withgoogle.com/docs/accelerator/get-... (Click yes on the enable maximum frequency)
Set up OpenCV using the following commands in the terminal
- sudo apt-get install python-opencv
- sudo pip3 install opencv-python==3.3.0.10 (A newer version should work too)
- sudo apt-get install libjasper-dev
- sudo apt-get install libqtgui4
- sudo apt-get install libqt4-test
Install Mosquito using the following instructions
- sudo apt-get install -y mosquitto mosquitto-clients
- sudo pip install paho-mqtt
Install RoboClaw libraries and dependencies
- https://resources.basicmicro.com/configuring-the-r... (Configure the RPI's serial port for communication with the RoboClaw)
- https://resources.basicmicro.com/packet-serial-wit...(how to install pyserial + setup the RoboClaw for the first time)
Install the Distance Sensor code:
pip install Bluetin_Echo
pip install monotonic
And that's it for installing the libraries.
To launch the code follow the following steps.(Alternatively you could use a startup script to do this automatically when the rover boots up)
Terminal 1 (main robot code)-
- cd to whatever directory you downloaded the github code to (Eg. cd /home/pi/raspberry_pi_packet_serial)
- sudo python roverMainScript.py
Terminal 2 (ultrasonic distance sensor)-
- cd to whatever directory you downloaded the github code to (Eg. cd /home/pi/raspberry_pi_packet_serial)
- python3 distance.py
Terminal 3 (object detection CV code)-
- cd to whatever directory you downloaded the github code to (Eg. cd /home/pi/raspberry_pi_packet_serial)
- python3 objectdetection.py
Terminal 4 (Snowboy voice recgnition)-
- cd to whatever directory you downloaded the github code to (Eg. cd /home/pi/snowboy)
- python demo2.py Robot.pmdl coco_cup.pmdl banana.pmdl follow_me.pmdl (You can add more '---.pmdl' wakewords for any other COCO objects you want to detect and pick up)
Step 8: Challenges I Faced + Prototypes I Discarded

To end this Instructable guide, I want to highlight some of the alternate methods I had tried before building the robot the way I did
- Using an external computer to process the object recognition. In this setup, I used the Raspberry Pi as a webcam server that took the webcam feed and transmitted it over the local network or internet to a powerful computer that did the object recognition and then sent the object recognition data back to the Raspberry Pi for movement calculations. I was almost forced to use this method since the Raspberry Pi had such a poor object detection FPS. This method was quite complex and added unnecessary complexity to the project. This also made the robot quite sluggish as there was a noticeable latency of streaming the webcam to another computer for processing and then streaming the processed data back to the Raspberry pi. It also meant that the Raspberry Pi had to be constantly connected to the internet and any momentary internet drop outs would render the robot useless. Thankfully, the Coral USB accelerator solved all those issues. It gave me good FPS performance for object detection and it also was so small, that it could fit on the rover itself! Furthermore, it didn't need an active internet connection to stream the webcam's video which meant that the whole rover could work perfectly regardless to if it was connected to the internet
- Using a basic motor controller. Initially I wanted to use an H-bridge styled motor control IC to control the robot's tank treads and the robotic sled motors. This was a disaster as the simple motor controller didn't offer precise positional control or easy implementation with a python library. The RoboClaw was huge step up as it was a very convenient 'plug-and-play' motor controller that was able to do extremely precise motor position control which was imperative to the robot sled to reliably pick up objects. Furthermore, the RoboClaw was very easy to configure in a multi RoboClaw mode which allowed me to connect 2 RoboClaw's to the Raspberry Pi's 1 hardware serial port. Furthermore the RoboClaw could be connected to the computer via a USB port which allowed me to easily do Auto-PID tuning, test all the motors, check that the encoders were wired in the right orientation etc.
- Using only one CV model. I was initially trying to just use the COCO object detection model to handle both the 'follow me' and 'find ___ object' command. This worked fine for finding objects and is what I am still using for the final version of this robot. However, I had issues with the follow me command as I was not able to do accurate face distance detection due to the person's detected area growing in size as he walked away from the camera and more of his body was in the camera's field of view. Furthermore, just raising your arms above your head made the object detection think that you have grown in size since its detecting a larger area boundary box now(I talked much more about this in step2). Since I could not use relative area for my distance calculations, I had initially though to interoperate a distance sensor mounted on a pan & tilt mount and aim that at the center of the detected person and use that to determine if the person is getting further or closer. As you can imagine, this would be unnecessarily complex, add to the list of parts this robot used, and also need a lot of tuning to make sure that the servos are pointing in the correct angle since the angle of the camera to person changes depending on their distance even if they are in the same position of the webcam frame. For this tuning, one would need to know the person's distance from the camera which is the thing we were trying to calculate in the first place. I solved this complex problem by simply using a dedicated face detection model for tracking face area since faces don't get cut out of frame the same way as the whole human body gets out of the camera frame and faces don't suffer from drastic changes in size.
- Using a robotic arm: Initially I wanted to use a robotic arm to pick up objects. However as I explained earlier in this project, a robotic arm was quite limiting in terms of how it could only pick up small and light weight objects. Furthermore, having to add a second camera for overhead CV analysis would have added much more complexity to this project. Nonetheless its a cool future upgrade for more niche tasks that the rover can't do (I talk more about this in the next step)
- Whale Shell: Before I built the robot to look like the Mars Opportunity rover, I built it to look like a whale. (I've attached a picture above). This didn't look as good as the rover does now.
Step 9: Future Upgrades + Potential Changes You Can Make

This project has been an incredibly ambitious project that has taught me a lot about Computer vision, Machine Learning, Robotics etc. It has been an absolute joy to put together this project but nonetheless, like every project, this project has room for improvement and upgrades.
Possible improvements and upgrades
- Integrate a voice assistant that uses natural language processing (NLP) to interact with the user and take natural sentence commands rather than exact commands. It would be even cooler if the voice assistant could link into Google Now or Amazon Alexa to be able to do more than what the robot can do. This would be especially useful with the 'follow me' mode of the robot since you could effectively always have the smart assistant follow you and always be able to hear you vs a plugged in voice assistant in another room
- Integrate a robotic arm in addition to the existing robotic sled. The robotic arm would enable the robot to do even more helpful stuff like potentially open doors, un-cap a bottle, and more generally be able to manipulate the environment rather than just pick up and carry objects like the robotic sled
- Simplify the electronics + Custom PCB. Currently there are a lot of different electronics in the robot all connected via jumper cables. I would love to be able to create a custom PCB that can integrate the step down converter, both the RoboClaw motor controllers, the raspberry pi, and the Coral USB accelerator into one single PCB. This could make the whole robot far sleeker too!


